
The Patient Portal Template is what Patients will see when they log in to your Patient Portal, regardless of the Location they are set to.
Important!
The Patient Portal is available to enable via the Billing page under Add-ons.

Contact support@nookal.com for more information.
The Patient Portal Template is what Patients will see when they log in to your Patient Portal, regardless of the Location they are set to.
1. Navigate to Setup.
2. Click on Patient Portal under Extensions.
3. Here you can see how many Locations are active, as well as brief summary of the number of Active Portals, Registered Patients, and monthly Bookings
4. You can open the individual Portal settings by clicking on the Portal name in blue.
5. You can view the list of current linked Locations and toggle their Included status as applicable.
You can adjust the Portal name, Welcome message, upload a Clinic Logo, and choose an Accent Colour.
The Live Preview is a preview only of the Accent Colour, Clinic Logo, Portal name, and Welcome message. It does not reflect the layout seen by the Patient when logged in to the Portal.
6. The Documents lets Patients see documents attached to their Patient file in the Portal.
You can choose Show all documents, Show after a number of days, or Hide all documents, and can toggle the Documents section on or off via the toggle in the top right of this setting.
7. Class Availability allows Patients to streamline their class bookings.
8. You can change whether Multi-factor Authentication messages are sent to Patients as Email or SMS.
9. You can set the Minimum Cancellation time to be used in the Patient Portal.
10. The Booking change notifications section allows you to automatically notify the clinic when Patients move, cancel or modify their Appointments and Classes from the Portal.
This includes notifying on Rescheduling of Appointments by the Patient, and or, on Cancellations.
11. Policies, are the Terms shown to Patients in the Portal.
12. Share your Portal, allows you to send Patients the link, or add a Portal button to your website.
What Patients can do
Turn features on for this Portal. Changes apply to every Location the Portal covers.
My Bookings section
This section allows your Patient to see their current and upcoming bookings in the Patient Portal with the following options to enable or disable:
- Make bookings - This allows Patients to make new bookings.
Confirm bookings - This allows Patients to Confirm bookings, instead of replying to a confirmation message.
Move bookings - This allows Patients to reschedule appointments.
Cancel bookings - This allows Patients to cancel their bookings.
-
Rebook appointments - This allows Patients to book an identical appointment based on a previous appointment.
If you don’t have Online Bookings turned on, the following options will be off and disabled:
Make bookings
Confirm bookings
Rebook appointments
Move bookings
- The "Allow Patients to cancel bookings" is independent of the Online Bookings being turned on.
Unpaid Bookings section
This section allows Patients to view Unpaid Bookings in the Patient Portal with the following options to enable or disable:
- View invoices - This allows Patients to view their Invoices for Past Bookings.
- Download invoices - This allows Patients to download their Invoices for Past Bookings.
- Pay for bookings - This allows Patients to pay their Invoices that for Past Bookings.
- Use passes - This allows Patients to use any of their Passes pay their Invoices for Past Bookings.
- Uses credits - This allows Patients to use Account Credits against their profile to pay their Invoices for Past Bookings.
The “Download invoices” option is linked to “View invoices” and will be disabled if this option is not checked
Chat section
This section allows Patients to send messages to the staff or the Location with the following options to enable or disable:
- Secure messaging - Allows the Patient to send and receive messages
-
Message locations - Allows Patients to send messages to the Location, which can be answered by any staff member with the following Permissions.
- Message providers - Allows Patients to specifically message logged in providers with the above Permissions.
- Send documents - Patients can attach a file to a message, Only a single file can be attached, and only PDF and DOC files can be attached.
Payment Methods Section
This section allows Patients to pay for bookings in the Patient Portal with the following options to enable or disable:
Payment methods - Allows Patients to store and manage cards in the Portal.
Debit cards - Patients can store debit cards.
Require Debit Card T&C Approval - Used to enforce that the Patient accept your terms and conditions for
using credit cards for payments.
Hot Tip
You will need a Stripe Connect account to use Credit card payment and Storage through the Patient Portal.
To activate this head along to Setup > Connections > Integrations > Stripe > Configure > Click Migrate to Stripe Connect.
In the pop up window select the Locations you want to use and click Connect.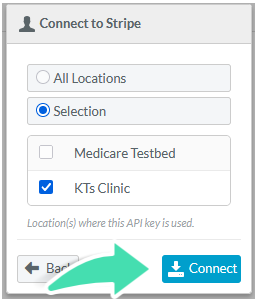
After doing this, simply log in to Stripe and connect your account by following the prompts.
Passes Section
This element allows Patients to use Passes to pay for Appointments as well as purchase Passes online with the following options to enable or disable:
- Passes - View pass balances in the Portal.
- Buy passes - Patients can purchase Passes.
- View redemptions - See where Passes were used.
- Download redemptions - Download the redemption history.
Patient Profile Section
This element allows the Patient to edit their Profile with the following options to enable or disable:
- Patient profile - Patients can view their own details.
- Edit profile details - Allows Patients to edit, change, or remove the information from their Patient Profile.